Update: I’ve written another post about some enhancements I made recently
Not only is my Squier Strat the first guitar I ever bought myself, it has been ripped apart, hacked and customized heavily over the years. Therefore, I can’t ever see myself getting rid of it (in spite of my current obsession with decluttering). Aside: Squier Silver Series Strats in good—stock—condition can fetch up to $700 on eBay which is nuts!
However, I don’t use it much these days. Therefore, I decided to convert it into a lap steel to put it to good use. I’ve documented the steps below…
Introduction
I want to get down and dirty with slide. I’ve struggled for years to get better at slide guitar. Using a regular guitar with action set the way I like it for non-slide play doesn’t work: the slide “grounds out” on the frets and fingerboard and sounds terrible. I’ve tried raising the action and this doesn’t quite cut it. I then thought about buying myself a lap steel guitar. There are cheap ones available such as the Rogue RLS-1 from Musician’s Friend which can be had for about $80. However, I am trying really hard to reduce the amount of clutter in my life. Buying another guitar, when I’ve only recently managed to get things down to a sensible number, is certainly not compatible with this. Another aside: given unlimited space, I would love to “round out” my guitar collection with a lap steel, an SG and an ES-335 or ES-339 and one of these beasts, but that’s not going to happen any time soon.
Anyway, I happened upon an article describing how to convert a regular acoustic or electric guitar using a fairly inexpensive extension nut. Here I’ll describe how I got my Squier up and running for slide for the princely sum of $16.
Parts
This is what I used:
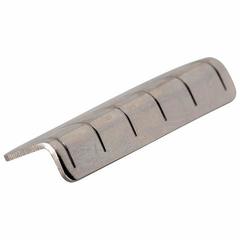
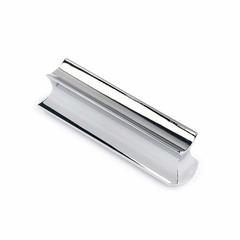
- Golden Gate F-3303 extension nut—$7.95 from Amazon
- A generic tone bar—$7.99 from Amazon
“Tone bar”, it turns out, is bluegrass-speak for “slide”, so I learnt even more in the process.
Block off the bridge
We’re not going to be using the whammy bar any more. I don’t have any photos of this process, but I used the following fairly standard approach (which I’ve used with success to block off Strat-style bridges in the past):
- Remove the rear cover to gain access to the tremolo block, string claw and springs
- Slacken off the strings
- Remove the springs from the string claw and tremolo block
- Insert stacks of coins (pennies) of the appropriate thickness into the cavity to immobilize the tremolo block
- Done!
Set the bridge action
Next I set the action at the bridge as high as possible. See below:
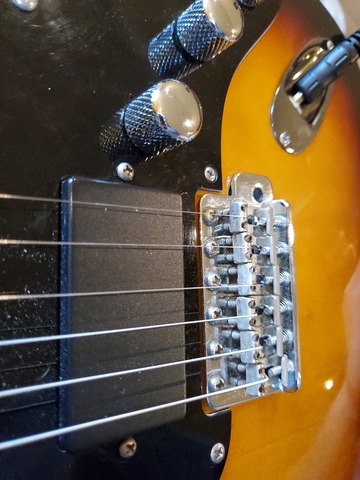
I was sceptical that this would be high enough to prevent the tone bar from grounding out on the fingerboard. I did wonder if I would need to invest in some new saddles or a new bridge or if I would need to shim the existing bridge somehow. This would, of course, have made my cheap-and-cheerful conversion considerably more expensive and less cheery that originally planned. I decided to push on and see what would happen without spending any extra money. Spoiler: the action was just fine without any further adjustment or investment.
You may notice that the third string is not properly seated in the saddle in the photo above. I slackened the string off and reseated it to fix this before I moved on to the next step.
Install the extension nut
This is the hardest part but is very straightforward:
- Slacken off the strings (if they’re not still slack after the last step)
- Slide the extension nut over the regular nut
- Tighten the strings up and bring them up to pitch
Here’s a view of the extension nut from the side:
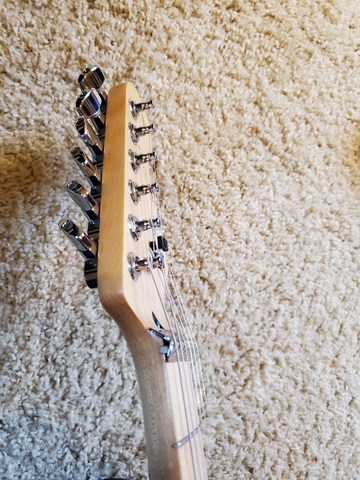
You can see that I have the long edge of the extension nut facing the tuners and the short edge facing the bridge of the guitar.
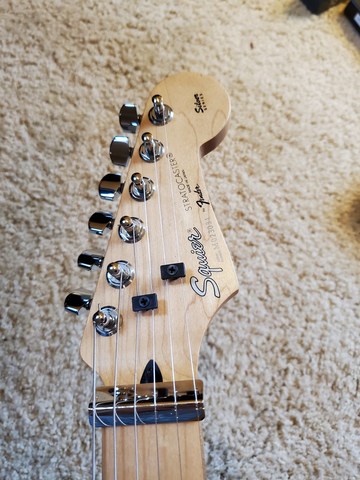
The only complication was that the string tension from the sixth (low E) string was preventing the string from sitting in the string slot in the nut. Despite all my efforts to position the extension nut to compensate for this, I could not get the sixth string to stay in the slot. And then a thought came to me: if I fed the string into tuner the opposite way round from normal, this might cause the string to apply tension in the right direction. This worked well. You may be able to see that I’ve wound this string in the opposite direction from normal in the photo above. If not, here’s a close-up:
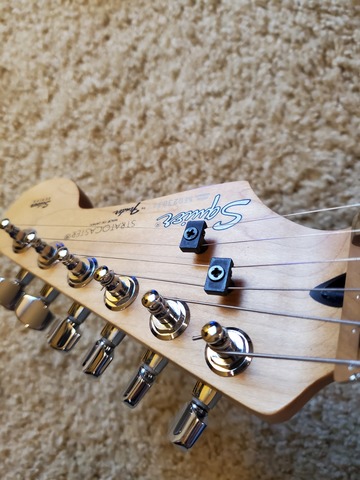
As long as I remember to turn the tuner in the right direction, this is quite a nice, elegant solution to this problem.
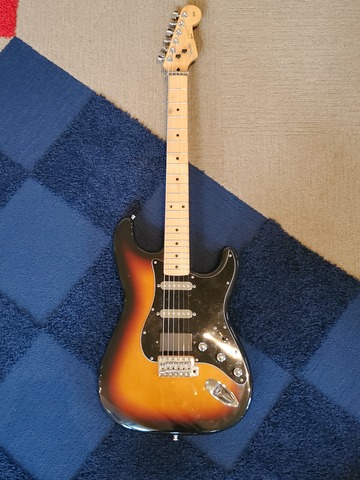
The end result
Here she is in all her glory:
Tunings and my first songs
I first tuned the guitar up to DADGAD—I’ve been using the tuning a lot recently and have written a number of new songs in it too. This tuning is pretty nice and has the property that it is neither major nor minor and has an interesting “suspended” flavour to it. I like it for its droning qualities.
I’ve also played with the DGDGBD open-G tuning which has proven very nice for jamming In My Time of Dying—my recording and tab—and other songs. I’m too scared about mangling my guitar’s neck to risk the “Dobro open-G” tuning of GBDGBD. I will do some research on what gauge strings would work for this tuning without damaging the neck etc.
Finally, I should add that currently I did all of this using Ernie Ball Super Slinky strings (0.009″–0.042″); nothing fancy yet.