Setting up passwordless PuTTY access to server Contents
Initial setup
You will only need to perform the setup steps in this section once on your Windows client machine. Some of these steps are moderately involved, so please do follow the instructions as closely as possible.
Install PuTTY binaries
- Download PuTTY from the official web site.
- Unblock the downloaded putty.zip file:
- Locate the file in Windows Explorer in your Downloads folder.
- Right-click on the file.
- Click Properties.
- Click Unblock.
- Create a new folder for the downloaded PuTTY binaries, e.g. putty-installation-directory.
- Extract the contents of putty.zip into this folder.
Generate public-private key pair
- In Windows Explorer, double-click on PUTTYGEN.EXE in the putty-installation-directory folder to launch PuTTY Key Generator.
- In the Parameters section of the main window:
- Set Type of key to generate to SSH-2 RSA.
- Set Number of bits in a generated key to 2048.
- In the Actions section, click Generate.
- Wiggle your mouse over the window as per the instructions. This generates lots of nice cryptographically secure random numbers.
- Set Key passphrase and Confirm passphrase to a strong passphrase: this is used to protect the private key on your local machine and is never transmitted to the server: the private key file is locally encrypted with this passphrase so that if your computer is compromised, the private key can only be used by someone with knowledge of the passphrase.
- Click Save private key, navigate to the folder putty-installation-directory and save your private key with the file name user-name.host-fqdn.ppk (the name is entirely up to you but the remaining instructions refer to this file name and you'll need to replace occurrences of this name with the name you choose here).
- Press Alt+P and Ctrl+C to copy the public key in OpenSSH format, paste this string (using Ctrl+V) into an e-mail and send this e-mail to me.
- Close this program and wait for me to install the public key on my server. When this has been done you can proceed to the next step.
Create a shortcut to unlock your private key when you log into Windows
- Right-click on the Windows desktop and select New and Shortcut.
- Enter putty-installation-directory\PAGEANT.EXE putty-installation-directory\user-name.host-fqdn.ppk in the text box under Type the location of the item:.
- Click Next.
- In the text box under Type a name for this shortcut: enter a name such as Unlock user-name.host-fqdn (the name is entirely up to you).
- Click Finish.
- Drag the newly created shortcut icon onto the Start menu and drop it inside your Startup folder.
Now, whenever you log into Windows you'll be presented with the following prompt: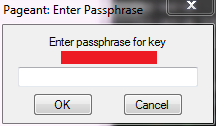
You should enter the passphrase you chose when you created the private key earlier on. This unlocks the local private key file and decrypts it into memory so that you can use the private key to connect to the server later on in the current Windows log-in session.
Create a shortcut to connect to server with PuTTY
- Right-click on the Windows desktop and select New and Shortcut.
- Enter putty-installation-directory\PUTTY.EXE user-name@host-fqdn -i putty-installation-directory\user-name.host-fqdn.ppk in the text box under Type the location of the item:.
- Click Next.
- In the text box under Type a name for this shortcut: enter a name such as user-name@host-fqdn (the name is entirely up to you).
- Click Finish.
- Move this shortcut to the location of your choice.
Install FileZilla
- Download FileZilla 3.5.3
- Unblock the downloaded FileZilla_3.5.3_win32.zip file:
- Locate the file in Windows Explorer in your Downloads folder.
- Right-click on the file.
- Click Properties.
- Click Unblock.
- Create folder filezilla-installation-directory.
- Unzip contents of FileZilla_3.5.3_win32.zip into filezilla-installation-directory.
- Open filezilla-installation-directory in Windows Explorer and create a shortcut to filezilla.exe with name FileZilla in a location of your choice.
Configure a FileZilla site for your account
- Launch FileZilla using shortcut.
- Press Ctrl+S to open Site Manager.
- Click New Site.
- Enter a name for your site, e.g. user-name@host-fqdn.
- Set following values (leave others empty):
- Host: host-fqdn
- Protocol: SFTP - SSH File Transfer Protocol
- Logon Type: Normal
- User: user-name
- Password: empty—FileZilla will use the Pageant authentication agent
- Click OK.
Logging into server
You'll need to do this each time you want to connect to the server:
- Double-click the user-name@host-fqdn shortcut created previously.
Note that the very first time you attempt to connect to the server from your machine you'll get the following security alert:
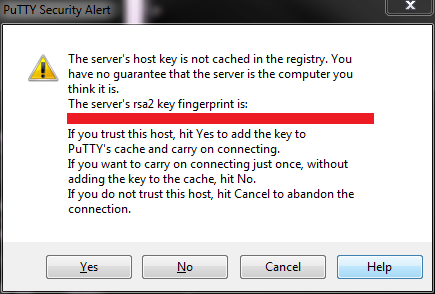
This is expected. Please verify that the displayed fingerprint is exactly as given in the example above—this identifies my server to your machine. Click Yes to permanently add this machine to PuTTY's cache. You'll never be prompted with this message again on this machine. If you ever see a window pop up like this, this indicates that the server's signature has changed. You should check with me to see if something odd has happened to the server.
Once you have successfully logged in, you'll see a shell window looking something like the following: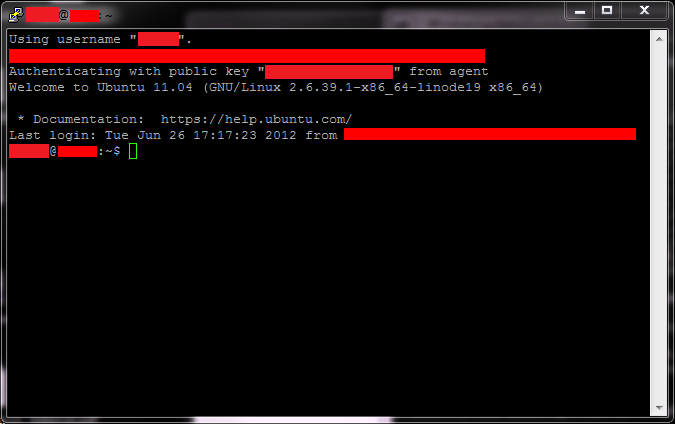
host-name is the host name of my server. As you can see, this server is running Ubuntu 11.04. The default shell is bash, so all the usual Linux commands will work. If you type ls, you'll see you have a www folder. This contains your web site.
Create a shortcut to start an SFTP session with PSFTP
- Right-click on the Windows desktop and select New and Shortcut.
- Enter putty-installation-directory\PSFTP.EXE user-name@host-fqdn -i putty-installation-directory\user-name.host-fqdn.ppk in the text box under Type the location of the item:.
- Click Next.
- In the text box under Type a name for this shortcut: enter a name such as sftp user-name@host-fqdn (the name is entirely up to you).
- Click Finish.
- Right-click the shortcut and select Properties.
- Enter the initial local directory for SFTP transfers in Start in:.
- Move this shortcut to the location of your choice.
This shortcut will start a secure SFTP session over SSH to the server assuming that you have the Pageant authentication agent running already. You can use commands such as lpwd and lcd to view/change the local directory and the usual FTP-style commands to transfer files to/from the server.
Transferring files with FileZilla
- Launch FileZilla with your shortcut.
- In tool bar, click down arrow next to the Open the Site Manager button.
- Select the site (e.g. user-name@host-fqdn) created before.
- Transfer files!
Appendix
A few words of explanation about why I asked you to create two shortcuts are in order:
- Pageant is the SSH authentication agent: it takes your .ppk file (which is an encrypted version of your private key) and decrypts it into memory after you supply the correct passphrase (this is when the "Startup" shortcut runs). This program continues to run in memory, so that you don't have to keep typing in your passphrase repeatedly for the lifetime of your Windows session. Whenever you log out (by logging out or by restarting or shutting down Windows), the decrypted private key is unloaded from memory and you must re-enter the passphrase the next time you log in. This provides a measure of local security for your private key while minimizing the number of times you are forced to enter your passphrase: if you regularly log out of your laptop and somebody steals your machine, then your private key is not compromised and the thief cannot log into your web server and start doing bad things to it. Since the passphrase is for local decryption of your encrypted private key file, you never need to share it with anybody (not even me), since I only need the public key (this is the ssh-rsa value I asked you to copy and paste from the key generator program) in order to securely identify you on my server. Passwordless authentication using public key cryptography is far more secure than password-based authentication which is why it is disabled on the server. I am a bit of a security fanatic as you may have noticed (and it sounds like you might be too!). The Pageant command line I provided for you means "run Pageant and decrypt the specified private key file (user-name.host-fqdn.ppk) into memory based on the user (that's you!) supplying the correct passphrase".
- PuTTY is the SSH shell program itself: this establishes a secure connection from your client machine to the server and runs the default shell on the server. The command line I provided for you means "establish an SSH connection for the user user-name on the host host-fqdn using the identity information in the private key file user-name.host-fqdn.ppk". If PuTTY detects that the Pageant agent is running with a decrypted version of user-name.host-fqdn.ppk in memory it will use that private key information to authenticate with the server and not require you to re-enter the passphrase. If Pageant is not running at this point, PuTTY will prompt you for the passphrase and decrypt the private key file itself.